Wednesday, 13 July 2011

Android ImageButton Example

Displays a button with an image (instead of text) that can be pressed or clicked by the user. By default, an ImageButton looks like a regular Button.Android Provide <ImageButton> tag to create button with image.using android:src attribute we can set background to ImageButton

Here Below Example show Creating ImageButton and display Toast message when user click on ImageButton.

UI layout(activity_main.xml)

<RelativeLayout xmlns:android="http://schemas.android.com/apk/res/android"
    xmlns:tools="http://schemas.android.com/tools"
    android:layout_width="match_parent"
    android:layout_height="match_parent"
    tools:context=".MainActivity" >

    <ImageButton
        android:id="@+id/imageButton_id"
        android:layout_width="wrap_content"
        android:layout_height="wrap_content"
        android:layout_centerHorizontal="true"
        android:layout_centerVertical="true"
        android:src="@drawable/ic_launcher" />

</RelativeLayout>


Android Activity (MainActivity.java)

package com.androidsurya.imagebuttonexample;

import android.os.Bundle;
import android.app.Activity;
import android.view.Menu;
import android.view.View;
import android.view.View.OnClickListener;
import android.widget.ImageButton;
import android.widget.Toast;

public class MainActivity extends Activity {
ImageButton imageButton;

@Override
protected void onCreate(Bundle savedInstanceState) {
super.onCreate(savedInstanceState);
setContentView(R.layout.activity_main);
imageButton = (ImageButton) findViewById(R.id.imageButton_id);
imageButton.setOnClickListener(new OnClickListener() {
@Override
public void onClick(View view) {
Toast.makeText(getApplicationContext(),
"ImageButton clicked.!!!!", Toast.LENGTH_SHORT).show();

}
});

}

@Override
public boolean onCreateOptionsMenu(Menu menu) {
// Inflate the menu; this adds items to the action bar if it is present.
getMenuInflater().inflate(R.menu.main, menu);
return true;
}

}

Screenshot:


Wednesday, 6 July 2011

Android Date Picker Example

This example  most simplest program on Android which is Date Picker. You can change the date which is being displayed in a Text View.

java code for it...

  here the java class extends from Activity class ......


public class DatePicker extends Activity {

private TextView mDateDisplay;
    private Button mPickDate;

    private int mYear;
    private int mMonth;
    private int mDay;

    static final int DATE_DIALOG_ID = 0;
  
  
    /** Called when the activity is first created. */
    @Override
    public void onCreate(Bundle savedInstanceState) {
        super.onCreate(savedInstanceState);
        setContentView(R.layout.main);
      
     // capture our View elements
        mDateDisplay = (TextView) findViewById(R.id.dateDisplay);
        mPickDate = (Button) findViewById(R.id.pickDate);

        // add a click listener to the button
        mPickDate.setOnClickListener(new View.OnClickListener() {
            public void onClick(View v) {
                showDialog(DATE_DIALOG_ID);
            }
        });

        // get the current date
        final Calendar c = Calendar.getInstance();
        mYear = c.get(Calendar.YEAR);
        mMonth = c.get(Calendar.MONTH);
        mDay = c.get(Calendar.DAY_OF_MONTH);

        // display the current date
        updateDisplay();
    }

As you can see first we are getting or capturing front end controls in our Java variables and then we have defined a OnClickListen event on button click...

CreateDialog method is responsible of opening a window which has a GUI related to date.


@Override
    protected Dialog onCreateDialog(int id) {
        switch (id) {
        case DATE_DIALOG_ID:
            return new DatePickerDialog(this,
                        mDateSetListener,
                        mYear, mMonth, mDay);
        }
        return null;
    }


// the callback received when the user "sets" the date in the dialog
    private DatePickerDialog.OnDateSetListener mDateSetListener =
            new DatePickerDialog.OnDateSetListener() {

                public void onDateSet(DatePicker view, int year,
                                      int monthOfYear, int dayOfMonth) {
                    mYear = year;
                    mMonth = monthOfYear;
                    mDay = dayOfMonth;
                    updateDisplay();
                }
            };


@Override
    protected Dialog onCreateDialog(int id) {
        switch (id) {
        case DATE_DIALOG_ID:
            return new DatePickerDialog(this,
                        mDateSetListener,
                        mYear, mMonth, mDay);
        }
        return null;
    }


Now your main.xml should look like this


<?xml version="1.0" encoding="utf-8"?>
<LinearLayout xmlns:android="http://schemas.android.com/apk/res/android"
android:layout_width="wrap_content"
android:layout_height="wrap_content"
android:orientation="vertical">

<TextView android:id="@+id/dateDisplay"
android:layout_width="wrap_content"
android:layout_height="wrap_content"
android:text=""/>

<Button android:id="@+id/pickDate"
android:layout_width="wrap_content"
android:layout_height="wrap_content"
android:text="Change the date"/>

</LinearLayout>

Monday, 4 July 2011

TableLayout in Android

TableLayout organizes content into rows and columns. The rows are defined in the layout XML, and the columns are determined automatically by Android. This is done by creating at least one column for each element. So, for example, if you had a row with two elements and a row with five elements then you would have a layout with two rows and five columns.
You can specify that an element should occupy more than one column using android:layout_span. This can increase the total column count as well, so if we have a row with two elements and each element has android:layout_span=”3″ then you will have at least six columns in your table.
By default, Android places each element in the first unused column in the row. You can, however, specify the column an element should occupy using android:layout_column.

Here is some sample XML using TableLayout. 


<TableLayout
android:layout_width="fill_parent"
android:layout_height="fill_parent"
xmlns:android="http://schemas.android.com/apk/res/android">
<TableRow>
<Button
android:id="@+id/backbutton"
android:text="Back"
android:layout_width="wrap_content"
android:layout_height="wrap_content" />
</TableRow>
<TableRow>
<TextView
android:text="First Name"
android:layout_width="wrap_content"
android:layout_height="wrap_content"
android:layout_column="1" />
<EditText
android:width="100px"
android:layout_width="wrap_content"
android:layout_height="wrap_content" />
</TableRow>
<TableRow>
<TextView
android:text="Last Name"
android:layout_width="wrap_content"
android:layout_height="wrap_content"
android:layout_column="1" />
<EditText
android:width="100px"
android:layout_width="wrap_content"
android:layout_height="wrap_content" />
</TableRow>
</TableLayout>

This is the result of that XML.


Saturday, 2 July 2011

RelativeLayout in Android

RelativeLayout lays out elements based on their relationships with one another, and with the parent container. This is arguably the most complicated layout, and we need several properties to actually get the layout we want.

Relative To Container

These properties will layout elements relative to the parent container.
  • android:layout_alignParentBottom – Places the bottom of the element on the bottom of the container
  • android:layout_alignParentLeft – Places the left of the element on the left side of the container
  • android:layout_alignParentRight – Places the right of the element on the right side of the container
  • android:layout_alignParentTop – Places the element at the top of the container
  • android:layout_centerHorizontal – Centers the element horizontally within its parent container
  • android:layout_centerInParent – Centers the element both horizontally and vertically within its container
  • android:layout_centerVertical – Centers the element vertically within its parent container

Relative To Other Elements

These properties allow you to layout elements relative to other elements on screen. The value for each of these elements is the id of the element you are using to layout the new element. Each element that is used in this way must have an ID defined using android:id=”@+id/XXXXX” where XXXXX is replaced with the desired id. You use “@id/XXXXX” to reference an element by its id. One thing to remember is that referencing an element before it has been declared will produce an error.
  • android:layout_above – Places the element above the specified element
  • android:layout_below – Places the element below the specified element
  • android:layout_toLeftOf – Places the element to the left of the specified element
  • android:layout_toRightOf – Places the element to the right of the specified element

Alignment With Other Elements

These properties allow you to specify how elements are aligned in relation to other elements.
  • android:layout_alignBaseline – Aligns baseline of the new element with the baseline of the specified element
  • android:layout_alignBottom – Aligns the bottom of new element in with the bottom of the specified element
  • android:layout_alignLeft – Aligns left edge of the new element with the left edge of the specified element
  • android:layout_alignRight – Aligns right edge of the new element with the right edge of the specified element
  • android:layout_alignTop – Places top of the new element in alignment with the top of the specified element
Here is a sample XML Layout

<RelativeLayout xmlns:android="http://schemas.android.com/apk/res/android"
android:layout_width="fill_parent"
android:layout_height="fill_parent" >
<Button
android:id="@+id/backbutton"
android:layout_width="wrap_content"
android:layout_height="wrap_content"
android:text="Back" />
<TextView
android:id="@+id/firstName"
android:layout_width="wrap_content"
android:layout_height="wrap_content"
android:layout_below="@id/backbutton"
android:text="First Name" />
<EditText
android:layout_width="wrap_content"
android:layout_height="wrap_content"
android:layout_alignBaseline="@id/firstName"
android:layout_toRightOf="@id/firstName"
android:width="100px" />
<TextView
android:id="@+id/lastName"
android:layout_width="wrap_content"
android:layout_height="wrap_content"
android:layout_below="@id/firstName"
android:text="Last Name" />
<EditText
android:layout_width="wrap_content"
android:layout_height="wrap_content"
android:layout_alignBaseline="@id/lastName"
android:layout_toRightOf="@id/lastName"
android:width="100px" />
</RelativeLayout>

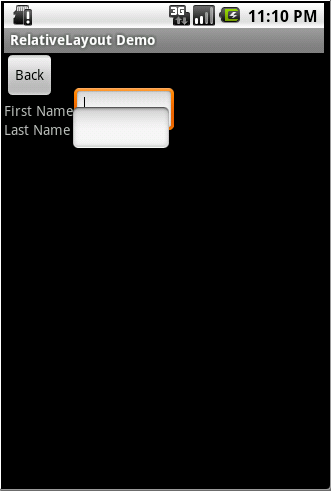
Here is the screen produced by that XML.

Relative1
I wanted to show this to you because the first time I made a RelativeLayout I did exactly this and then looked at the screen and said, “Hang on a minute, that’s not what I wanted!” The problem here is that when Android draws the TextView lastName below the TextView firstName it only sets aside the space it needs for the TextView. Android only reads the Layout XML one time so it doesn’t know that an EditView is the next item and doesn’t plan for it. So when the EditView is drawn to the right of the TextView it only has the height of the TextView to work with so it overlaps the EditView above it.

 Here is the Layout XML I wrote to create the form the way it should look.

<RelativeLayout
android:layout_width="fill_parent"
android:layout_height="fill_parent"
xmlns:android="http://schemas.android.com/apk/res/android">
<Button
android:id="@+id/backbutton"
android:text="Back"
android:layout_width="wrap_content"
android:layout_height="wrap_content" />
<TextView
android:id="@+id/firstName"
android:text="First Name"
android:layout_width="wrap_content"
android:layout_height="wrap_content"
android:layout_below="@id/backbutton" />
<EditText
android:id="@+id/editFirstName"
android:width="100px"
android:layout_width="wrap_content"
android:layout_height="wrap_content"
android:layout_toRightOf="@id/firstName"
android:layout_below="@id/backbutton"/>
<EditText
android:id="@+id/editLastName"
android:width="100px"
android:layout_width="wrap_content"
android:layout_height="wrap_content"
android:layout_below="@id/editFirstName"
android:layout_alignLeft="@id/editFirstName"/>
<TextView
android:id="@+id/lastName"
android:text="Last Name"
android:layout_width="wrap_content"
android:layout_height="wrap_content"
android:layout_toLeftOf="@id/editLastName"
android:layout_below="@id/editFirstName" />
</RelativeLayout>

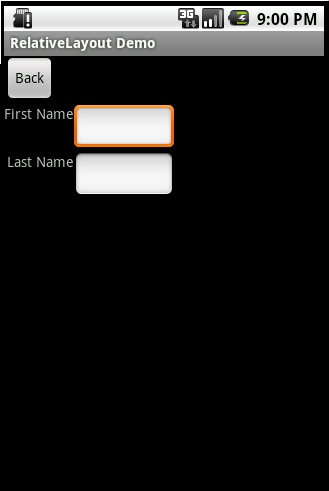
You probably noticed that I had to rearrange the elements in the XML since, as I already mentioned, you cannot reference an element that has not already been laid out. Here is what the updated RelativeLayout produces.


Relative2
(This information is taken from learn-android Thanks for providing valuable information.)

Friday, 1 July 2011

LinearLayout in Android

LinearLayout organizes elements along a single line. You specify whether that line is verticle or horizontal using android:orientation. Here is a sample Layout XML using LinearLayout.

<LinearLayout xmlns:android="http://schemas.android.com/apk/res/android"
    android:orientation="horizontal"
    android:layout_width="fill_parent"
    android:layout_height="fill_parent">
     <Button
        android:id="@+id/backbutton"
        android:text="Backbutton"
        android:layout_width="wrap_content"
        android:layout_height="wrap_content" />
    <TextView
        android:text="First Name"
        android:layout_width="wrap_content"
        android:layout_height="wrap_content" />
    <EditText
        android:width="100px"
        android:layout_width="wrap_content"
        android:layout_height="wrap_content" />
    <TextView
        android:text="Last Name"
        android:layout_width="wrap_content"
        android:layout_height="wrap_content" />
    <EditText
        android:width="100px"
        android:layout_width="wrap_content"
        android:layout_height="wrap_content" />
</LinearLayout>

Here is a screenshot of the result of the above XML


Here is a screenshot of the same XML except that the android:orientation has been changed to horizontal.


You might note that the EditText field at the end of the line has had its width reduced in order to fit. Android will try to make adjustments when necessary to fit items on screen. The last page of this tutorial will cover one method to help deal with this.

I mentioned on the first page that Layouts can be nested. Linear Layout is frequently nested, with horizontal and vertical layouts mixed. Here is an example of this.
<LinearLayout xmlns:android="http://schemas.android.com/apk/res/android"
        android:orientation="vertical"
        android:layout_width="fill_parent"
    android:layout_height="fill_parent">
     <Button
        android:id="@+id/backbutton"
        android:text="Back"
        android:layout_width="wrap_content"
        android:layout_height="wrap_content" />
    <LinearLayout
        android:orientation="horizontal"
        android:layout_width="fill_parent"
        android:layout_height="wrap_content">
            <TextView
                android:text="First Name"
                android:layout_width="wrap_content"
                android:layout_height="wrap_content" />
            <EditText
                android:width="100px"
                android:layout_width="wrap_content"
                android:layout_height="wrap_content" />
    </LinearLayout>
    <LinearLayout
        android:orientation="horizontal"
        android:layout_width="fill_parent"
        android:layout_height="wrap_content">   
            <TextView
                android:text="Last Name"
                android:layout_width="wrap_content"
                android:layout_height="wrap_content" />
            <EditText
                android:width="100px"
                android:layout_width="wrap_content"
                android:layout_height="wrap_content" />
    </LinearLayout>
</LinearLayout>

As you can see we have a Vertical LinearLayout whose children are a button, and two horizontal LinearLayouts. Each horizontal LinearLayout has two child controls. You should note that in the child LinearLayout elements I used android:layout_height=”wrap_content” instead of fill_parent. If I had used fill_parent the first name TextView and EditView would have taken all of the available space on the screen, and the Last Name would not have been displayed. Here is what this XML does display.


Nested Layouts do not have to be of one type. I could, for example, have a LinearLayout as one of the children in a FrameLayout.


Android SQLite Database Viewer or Debuging with Stetho

Every Android Developer uses SQLite Database to store data into the Android Application data. But to view the data in SQLite have a lot of...